Ugrás a tartalomra

Hogyan másolhatunk egy találkozót egy másik napra az Outlook naptárban?

Az Outlook naptárában megpróbáltam másolni egy találkozót egy másik napra másolással és beillesztéssel. Azonban csak a megbeszélés tárgyát másolták, az alábbi képernyőképen. De le kell másolnom az egész találkozót, kivéve a kezdő / befejező dátumot, van valami ötleted?


Másoljon egy találkozót egy másik napra az Outlook naptárban a Ctrl gombbal

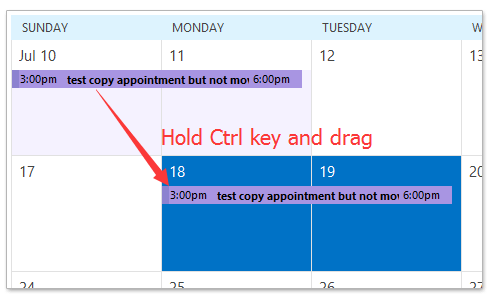
A Naptár Az Outlook nézetben válassza ki a másolni kívánt találkozót, és húzza át egy másik napra a Ctrl gombot, majd engedje el az egeret.

Most pedig a kiválasztott találkozót pontosan másolja egy másik napra, kivéve annak kezdő és befejező dátumát. Lásd a képernyőképet:


Másoljon egy találkozót egy másik napra az Outlook naptárban az egér jobb gombjával

A Naptár Az Outlook nézetben húzza a találkozót az egér jobb gombjának nyomva tartásával, engedje el az egeret a megadott napig, ahová átmásolja, majd válassza ki a másolat az előugró helyi menüből. Lásd a képernyőképet:

Most pedig a találkozót a megadott napra másolja az Outlook naptárába. Lásd a képernyőképet:

Minden e-mailt automatikusan továbbít a megadott címzettnek az Outlook programban

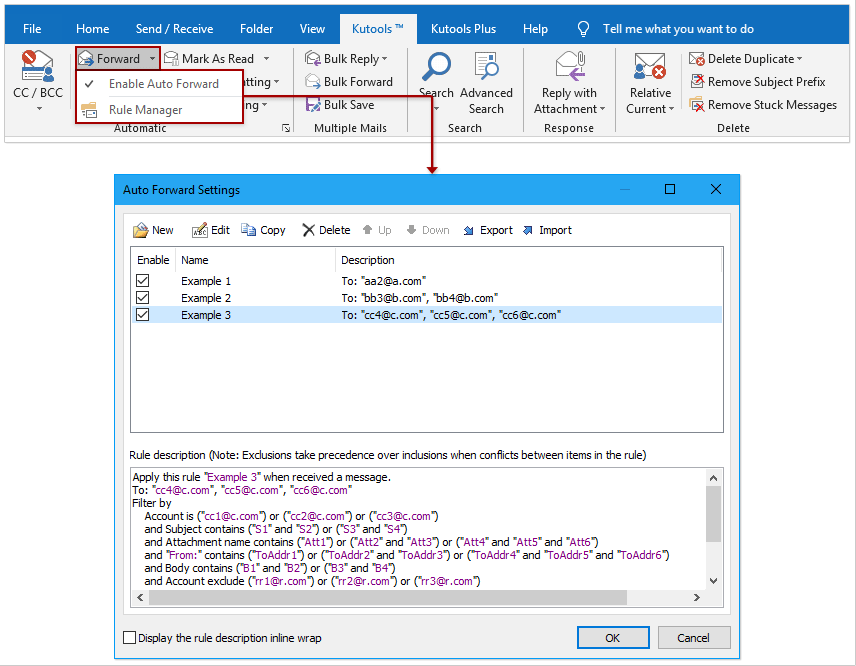
Általánosságban elmondható, hogy beállíthatunk egy szabályt, amely automatikusan továbbítja az e-maileket a megadott címzetteknek, például egy másik e-mail fiókjának, Gmail-fiókjának vagy kollégáinak stb. Tudjuk azonban, hogy egy egyéni szabály konfigurálása sokáig tart. Outlook. Most bemutatjuk a Kutools for Outlook programot (Automatikus) Előre funkció, amely csak több kattintással állíthat be automatikus továbbítási szabályt.


automatikus e-mailek továbbítása

Kapcsolódó cikkek


A legjobb irodai hatékonyságnövelő eszközök

Kutools az Outlook számára - Több mint 100 hatékony funkció az Outlook feltöltéséhez

🤖 AI Mail Assistant: Azonnali profi e-mailek mesterséges intelligencia varázslattal – egyetlen kattintással zseniális válaszok, tökéletes hangnem, többnyelvű elsajátítás. Alakítsa át az e-mailezést könnyedén! ...

???? E-mail automatizálás: Hivatalon kívül (POP és IMAP esetén elérhető)  /  Ütemezze az e-mailek küldését  /  Automatikus CC/BCC szabályok szerint e-mail küldésekor  /  Automatikus továbbítás (Speciális szabályok)   /  Automatikus üdvözlet hozzáadása   /  A több címzettnek szóló e-mailek automatikus felosztása egyedi üzenetekre ...

📨 Email Management: Könnyen visszahívhatja az e-maileket  /  Blokkolja az alanyok és mások átverő e-mailjeit  /  Törölje az ismétlődő e-maileket  /  Részletes keresés  /  Mappák összevonása ...

📁 Attachments ProKötegelt mentés  /  Batch Detach  /  Batch tömörítés  /  Automatikus mentés   /  Automatikus leválasztás  /  Automatikus tömörítés ...

🌟 Interface Magic: 😊További szép és menő hangulatjelek   /  Növelje Outlook termelékenységét a füles nézetekkel  /  Minimalizálja az Outlookot a bezárás helyett ...

👍 Csodák egy kattintással: Válasz mindenkinek a bejövő mellékletekkel  /   Adathalászat elleni e-mailek  /  🕘A feladó időzónájának megjelenítése ...

👩🏼‍🤝‍👩🏻 Névjegyek és naptár: Névjegyek kötegelt hozzáadása a kiválasztott e-mailekből  /  Egy kapcsolattartó csoport felosztása egyéni csoportokra  /  Távolítsa el a születésnapi emlékeztetőket ...

Több, mint 100 Jellemzők Várja felfedezését! Kattintson ide, ha többet szeretne megtudni.


Comments (12)
Rated 5 out of 5 · 1 ratings
This comment was minimized by the moderator on the site
Muito obrigado! Funciona e é simples e rápido de fazer. A explicação com as imagens ajudou muito.
Rated 5 out of 5
This comment was minimized by the moderator on the site
I was able to follow Bethanne's comments and was successful after cursing MS on this for months. THANKS! "Find your folders pane. Mine is on the left of the screen and shows just two months over the list of folders. One can resize the folders pane to reveal more months. There's a border between the folders pane and the main calendar view. Hover over that border and your cursor arrow changes to the column resize icon. Now drag the border over to make the folders pane bigger and the main view smaller. More months will appear in the folders pane." Then, follow the suggestion to hold CTRL to copy while dragging the appointment you want to duplicate to the new callendar location, and DROP it.
This comment was minimized by the moderator on the site
On the left side of your screen should be a folder pane. Open and pin it to stay open, if it is not already. Click on the date of the appointment/meeting you want to copy. Then find the date in the control pane you want to copy the appointment/meeting to. Hold the ctrl button while clicking on the date(s) you want to copy to. All chosen date should appear on your screen. Then you can use the drag and drop with right click on the mouse, or hold ctrl while drag & dropping to the next date(s).
This comment was minimized by the moderator on the site
On my machine, any of the copy-paste methods (inc. ctrl+c, ctrl+v) do not copy the reminder - the one thing that definitely should be copied!
This comment was minimized by the moderator on the site
Thank you, thank you, thank you for posting this!
This comment was minimized by the moderator on the site
On a Macintosh computer, you hold down the Option key, then click and drag the item to a different day.
This comment was minimized by the moderator on the site
Copying the appointment by dragging doesn't work if the target date is not visible on the screen. The calendar does not scroll while you are dragging the appointment.
This comment was minimized by the moderator on the site
Hi,
Here is a workaround may help you.
Drag to copy the appointment to any one date close to the target appointment, and then modify the start date and end date of the new appointment.
Hope it helpful!
This comment was minimized by the moderator on the site
Agree, this is what I am trying to do as well. Anyone found a solution?
This comment was minimized by the moderator on the site
Did you find an answer for this, Guy? I need to know the very same thing.
This comment was minimized by the moderator on the site
Sandra's got the right answer, but I'll be more specific: Find your folders pane. Mine on the left of the screen and shows just two months over the list of folders. One can resize the folders pane to reveal more months. There's a border between the folders pane and the main calendar view. Hover over that border and your cursor arrow changes to the column resize icon. Now drag the border over to make the folders pane bigger and the main view smaller. More months will appear in the folders pane. It drove me absolutely crazy until I figured this out.
This comment was minimized by the moderator on the site
where you can view multiple months on the side or wherever you position them, you can view more than a year's worth if you click and drag the dragger* (sorry i don't know the correct term) you can then right-click your calendar invite, drag & drop it onto any day you choose
There are no comments posted here yet
Please leave your comments in English
Posting as Guest
×
Rate this post:
0   Characters
Suggested Locations